Love, Laughter & Lace

Love, Laughter & Lace

DIY cards

Wednesday, November 26, 2014

Baby Daum expected May 2015

Chris and I are happy to announce we're excepting a little bundle of joy of our own.
We shared the exciting news with our immediate family and friends early on in a number of different funny ways. My Dad got a 'Grandpa burger' from A&W, Chris' family got name tags indicating their new titles (Auntie Lisa, Great grandma Erna) and we also had  friends help us with dinner and they found a bun in the oven ha.

Once we were ready for the rest of our world to know we did a mini photo shoot at our family cabin in the Cariboo. My sister and sister in law were our very professional photographers, helping us with lighting and placement for the props which helped a lot. While taking the photos we thought we had some really good ones then decided on the very last photo that was taken, typical ha. I couldn't be happier with it. The Teddy Bear, rocking chair and Cowichan sweater were all Chris' from when he was a baby! I can't wait to dress our little baby in the sweater to match ours!

 
Here are a few other photos that we took that day


Then of course there were a few silly ones! Don't worry I was just holding the beer and of course the gun wasn't loaded. I think this was Chris' way of preparing for if it's a girl!


Wednesday, August 13, 2014

Garden update: 2 weeks of water, sunshine and love

It's pretty amazing what happens after 2 weeks, water, sunshine and Love ha ha.

It seems the lettuce is in the lead, then the snow peas and cucumbers. The Bush beans were added a little later but we're hoping they'll fill the teepee. I added Dahlia's to the front of the plot to add some colour...I can't wait for them to bloom!

Tuesday, August 12, 2014

DIY Patio Herb Garden with wine cork lables

Having the community garden has been great however when we're cooking dinner and need some fresh parsley I thought it would be handy to have some growing at home. My patio doesn't have much room after the table, chairs, bench and BBQ. After scrolling around on Pintrest I found a  number of ways to use the space you have and I decided on Soup can planters (I decided to use Chick Pea cans instead as their a little bigger).

I used a hammer and nail to make drainage holes at the bottom then I put two holes on the side then used natural Burlap string to tie them to the railing. I couldn't decide on how to lable my herbs as there are so many creative was but then I looked above our cabinents at the giant vase we toss our wine corks into. I wrote the name of each herb and stuck it in the soil using a kebab stick and voila! I don't know why I was surprised but I couldn't believe how many red wine corks I had lying around!!


The Herb Garden box was a gift from my Brother Sean and his wife Stacey. I decided to keep the planters in them to have everything separate, also I found when I had it filled with dirt it wasn't getting enough drainage. also you want to keep your mint separate from your other herbs or it will just take over!  


Who doesn't love a white picket fence

Everyone knows once you plant your seeds all you can do is water and wait. Chris and I would come every night to give the garden a good soak and add any items we've picked up from yard sales, thrift stores or in this case behind the shed at my Mom and Dad's house. I don't know what brought me back there but as soon as I saw it I remember it was as used at my brothers wedding and now was collecting cobwebs, I knew the perfect place for it!


Friday, June 6, 2014

Adding some personality

Once we put a few rows of seeds into the ground we noticed things took off quickly.

After volunteering for the day at London Farm garden sale we got tips from the veteran gardeners. I also scored a few items that I was very excited would add a little personality to our space (of course only adding to the pink flamingo that went in on day 1). The two square frames were about a dollar each. The wooden one made a great barrier for the strawberries. I originally had flowers as you can see from the photo below however Chris put up a fuss that this was prime real estate and should be used for something edible...strawberries were the perfect compromise of pretty flowers, edible and a must in any garden.

The second frame was the base for my peas. I knew I wanted something fun for them to grow up. We already have the tent with netting for the beans but I love snap peas so why not since we have the room.


I had my mom help me build the teepee trellis. We put the middle bamboo stick in first then one by one added the thinner twigs. I needed the second set of hands, definitely wouldn't have been able to do it myself.

Once we used up all of the sticks we wrapped the top with wire. I also wrapped the wire half way down for the vines to have more area to latch onto .


After removing the flowers and putting the strawberry plants into the planter we added a long stick that we found across the street at the beach. We were on our bikes so it was very funny watching Chris drag it while I was riding alongside him drinking a my wine in a to-go cup ha.

The stick ended up being more functional then we thought, it was nice to rest your arm on it while you were putting seeds in the rows. In other rows found I did a lot of lunging while trying to reach the other end of the row.  

In the photo below we had just planted the lettuce. The ones we started at home didn't take in the hard clay so we also added some new fertilizer
 
I love how every time we go we make changes or add something or see our little plants grow. I can't wait to make a salad ha.


Just a pile of dirt.

When I was growing up we had a massive garden at Mom and Dad's house. When Chris brought me to our new plot at the Community garden at London Farm I was pleasantly surprised by the size..We had big plans for this pile of dirt!

 
As the seedlings are starting to grow at home we had to get the soil ready. Now in hindsight we probably should have mapped out where we wanted things to a go a little better however we were just too excited and wanted to get things in the ground.


Thursday, April 17, 2014

Starting your vegetable seeds indoors


I will be the first to admit I don’t have a green thumb. I try very hard but things don’t always work as planned. Chris and I have decided to take on a plot at a community garden which we’ll love and care for together. (This way if things go wrong I have someone else to blame!)

He came home the other day with seeds, starter pods, a tray to make our indoor greenhouse and a chart with the timeline for each of our vegetable’s planting schedule.

Again we are just going on things we have heard from friends and read online.

 Here are the first few steps we took in preparing our seedlings indoors.

  • Label each row of pods. I found it easier to make stickers and put on the tray. If you place a popsicle sticks in the first one of each row you might lose track when you’re planting into the garden. I also made sure to indicate which type of kale or lettuce as it’ll be good to know which I prefer when it comes to making a yummy salads…I’m staying positive!!

  • Place 3-4 seeds in each pod (apparently you put a few seeds in each in hopes one will take)

  • Gently pour warm water over the tray

  • Put the lid on
  • Place in a heated room under  towel. We chose our spare bedroom on a table at the window right above a heat vent.
  • Now we wait.
(I’m not going to lie, even though I know it’ll take up to 10 days to see anything I have checked on it every day ha)

I'm very excited and have a clear vision of what my future garden will look like...fingers crossed!!

Friday, March 7, 2014

Friday pick-me-up!

I don't know about you but sometimes I find myself at home with nothing to do and wishing I was out with friends having fun. Then on other days, like today, it's a beautiful semi-sunny Friday afternoon and although I have a plans with friends, all I can think about is curling up on the couch with a glass of wine and watching multiple episodes of House of Cards!

Why do we do this? We should save the lounging around for gloomy Sunday afternoons and get yourself excited for a night out with friends.  So the next time you're contemplating whether to stay in or go out, here is a little something from the fabulous Miss Elizabeth Taylor.


Friday, February 14, 2014

Spreading the love!

HAPPY VALENTINE'S DAY!!!
 
I know it's been a while, I thought today would be the perfect day to spread some love.
 
When I get sappy over a movie my husband will usually respond with "its just a movie" however he agrees The Notebook isn't just another 'chick flick.'
 
Allie: Do you think in another life, I could have been a bird?
Noah: What do you mean?
Allie: Like reincarnation.
Noah: I don’t know.
Allie: I think I could. Say ‘I’m a bird.’
Noah: No. Won’t do it.
Allie: Say I’m a bird.
Noah: Stop it. Stop it now.
Allie: Say it!
Noah: You’re a bird.
Allie: Now say you’re a bird, too.
Noah: If you’re a bird, I’m a bird.
 
Allie: Do you think in another life, I could have been a bird?
Noah: What do you mean?
Allie: Like reincarnation.
Noah: I don’t know.
Allie: I think I could. Say ‘I’m a bird.’
Noah: No. Won’t do it.
Allie: Say I’m a bird.
Noah: Stop it. Stop it now.
Allie: Say it!
Noah: You’re a bird.
Allie: Now say you’re a bird, too.
Noah: If you’re a bird, I’m a bird.
 
 
I've often put Chris on the spot asking him if I'm a bird just like Allie asks Noah. Over the years he's learnt there's not point pretending like he doesn't know what I'm talking about therefore he answers sweetly: If you're a bird, I'm a bird!


And if that wasn't enough:


Monday, October 28, 2013

vintage/shabby chic photo wall

I can't believe how long it's been since my last post. I guess that shows how busy the summer was! Now that we're full swing into fall like most like most people I have been nesting like crazy.

Over the weekend I decided it was time to update the photo wall in my dining room.

When we moved in two years ago and I used black plastic frames from the dollar store to hang our photos. I never really liked the frames but I wanted the pictures up so I settle with it. (never settle ha)

Needless to say I was never crazy about the wall. Over the two years our townhouse has evolved from the miscellaneous pieces that I brought from my old apartment (which were mostly made up of items that were given to me by people trying to get rid things) into semi grown up items that my husband and I purchased and found at different stores and vintage shops.

The layout and décor has finally come together and we couldn’t be happier or more comfortable in our little home….except for the photo wall!

I scoured through thrift stores for a variety of frames in gold and brown, I then went to Ikea for a mix of all white frames (so much more affordable then other stores I had found). I wanted to have the vintage, shabby chic element without being too girly (this has been the main theme throughout the house). (I should also mentioned originally I tried to save a few dollars by spraying the old black frames with white spray paint...I often find vintage items and spray or paint them white but because the frames were plastic it was a huge waste of time but now I know better).

Getting started:

Have your nails, hammer and steps tool nearby.  
Fill the frames with the photos.
 
I Decided to keep the majority of photos that were already on the wall. I like keeping a variety of our favourites from over the years along with recent ones.

I laid all of the frames on the floor and arranged them in a way that I felt was eclectic yet organized. Chris must have thought I was crazy for standing over them and moving them around and around. I wanted to make sure there was a balance to who was in the photo to which frames looked good beside each other.

When I was set on the layout I took a photo of the collogue to reference while I was nailing frames into the wall.

I started with one central photo and made my way through them all. I took my time to make sure the spacing around each of them were roughly the same (I knew not to obsessed over having it perfect especially with a such a variety of frames). I recommend stopping and taking a step back every once and a while to make sure it’s what you had in mind. I’d also suggest not fixating on having them all exactly straight until you have them all up.

Once I had hung all of the photos I noticed I had a little extra space between two photos, I decided to hang one of my many vintage keys (I have a bit of a key thing). I was really happy with the little extra touch, reminder you can add anything you want to your wall!

Here is a before and after photo of the wall… When deciding on how many frames to do, how high or how low to have them I think it’s best to do what you think looks good since you're the one who has to live with it.

 
BEFORE 
 
AFTER
 

We had friends over for dinner last night and after staring at it all night I decided I was happy with the new wall. The height of the bottom row looked good with people sitting at the table and the high of the top row was nice since they weren't too high. I think if anything were to change it would be adding frames on either side.

Another tip I learnt the hard way was that not all frames are for hanging. I noticed most of the ones I found at thrift stores were for table top. In that case I broke off the stand and wrapped a piece of wire around the backing. You just have to get a little creative.

I think a good reminder is that even if it’s not perfect no one is going to notice, they’re looking at the fun arrangement of photos.

I’m really happy with how it turned out, I think I'll start gathering more frames do another collogue going up the staircase.


Wednesday, July 17, 2013

Crochet

Summer is officially upon us and although I love fall fashion I’m a sunshine loving, flower child at heart!! 
 
Jeans shorts, sandals, tank tops, bikini’s and summer dresses are my go-to staples and if you’re like me you like to toss in a little crochet when the mood suits you.  

For me I think it all started from a crochet halter top that my girlfriend lent me in grade 7 that my mother didn’t let me wear out…so of course I changed into it once I left the house!
 
 
Dresses
 
Becki Newton
 
 
Kate Bosworth


Tops

Alexa Chung
 
Olivia Palermo

Kate Moss (AMAZING!)

Vanessa Hudgens (this is like the purple one I wore...love it!)


Shorts


Crochet gone wrong
Leanne Rimes
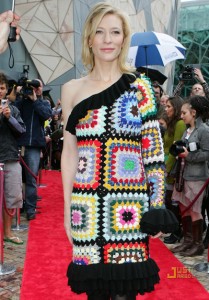
This dress works on the runway but not your 'pre wedding brunch'
 
 
Cate Blanchett


Vintage Crochet Fashion
Twiggy


Tuesday, April 16, 2013

Printed Pants

Spring has official sprung and there’s nothing better than adding some bright colours to your wardrobe.

Chris and I attended wedding last week and I wanted to start the season off right. I found these floral silk pants at Aritzia and knew they’d be fun for a beautiful spring wedding.

I also got to pair them with my satin Manolo Blahnik wedding shoes which was a definite bonus.
 
Marais Pant, Manolo Blahnik shoes, Minou Camisole, Equis Jacket,'Miss Havisham' encrusted horseshoe necklace, Michael kors oversizes runway watch, Small diamond dust hing bracelet by Alexis Bittar, Tory Burch Aviators

 
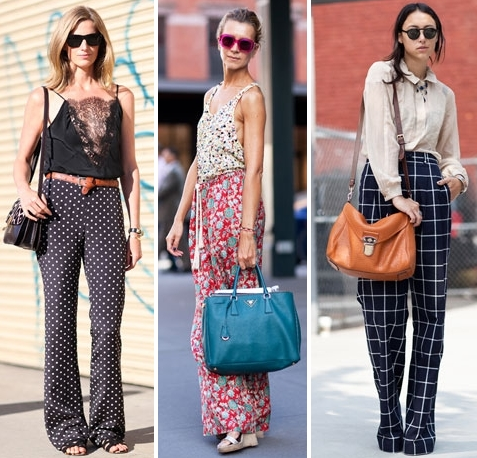
Here are some more inspirational pants to get you excited for warmer weather:


Keep it simple


Alexa Chung


Miranda Kerr


Casual
Jenna Dewan

Michelle Williams


Pop of colour
Sienna Miller


Print on print
Olivia Palermo


Wide leg